Clariti generates professional documentation for design verification, specification, and project records. This guide covers all export options.

Export Options

Clariti offers several export formats:
FormatPurposeAudience
PDF ReportFull calculation documentationChecking engineers, authorities
Specification TextContract document wordingSpecifications, schedules
Summary SheetQuick referenceSite, procurement
CSV DataData integrationBIM, databases

PDF Calculation Report

What’s Included

The comprehensive PDF report contains: Cover Page:
  • Project name and reference
  • Connection identifier
  • Date and version
  • Clariti branding and disclaimer
Project Summary:
  • Concrete parameters (class, condition, exposure)
  • Overall geometry summary
  • List of connections in project
Connection Details (per connection):
  • Geometry diagram with dimensions
  • Load case summary table
  • Selected product information
Verification Results:
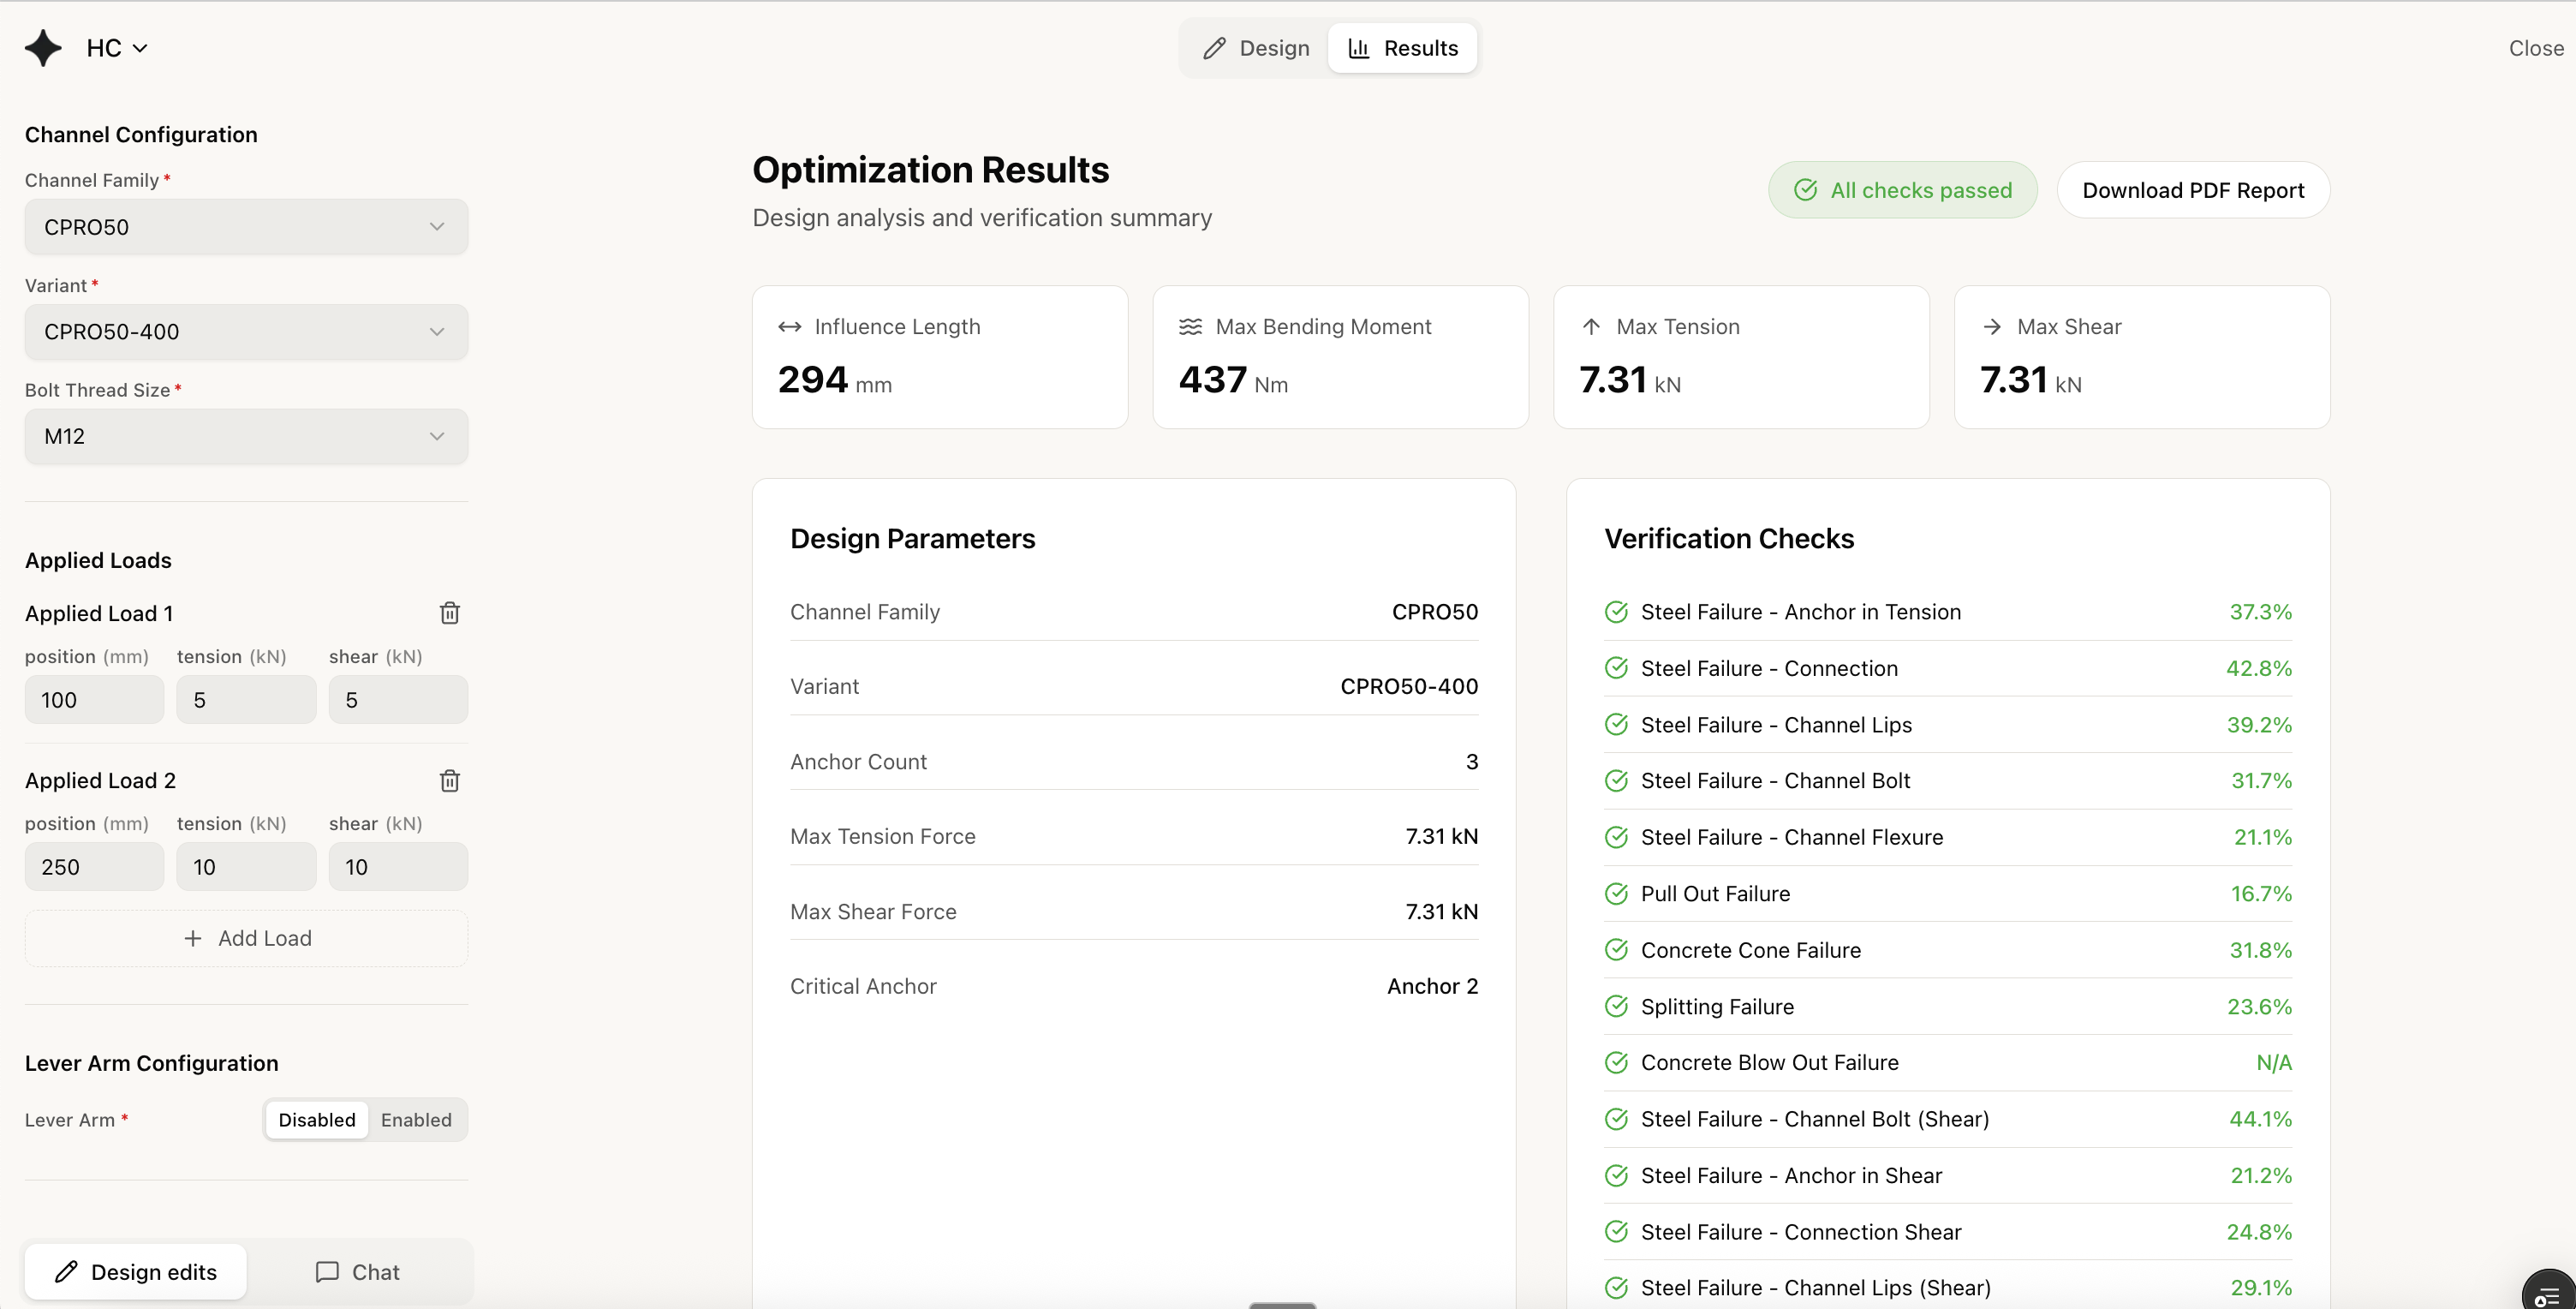
  • Summary pass/fail status
  • Mode-by-mode utilization table
  • Governing mode highlighted
Detailed Calculations:
  • Full EN 1992-4 calculations
  • Each failure mode expanded
  • All factors shown with values
  • Step-by-step equation evaluation
Product Data:
  • ETA reference
  • Key product parameters
  • Manufacturer information
Appendices:
  • Notation and symbols
  • References to EN 1992-4 clauses

Generating the Report

  1. Open Export Menu

    Click Export in the header bar.
  2. Select PDF Report

    Choose PDF Report from the options.
  3. Configure Contents

    Select what to include:
    • Project summary
    • Connection geometry (diagrams)
    • Load case summary
    • Results summary
    • Detailed calculations
    • Product data sheets
    • References/notation
  4. Choose Detail Level

    LevelContents
    SummaryResults tables only
    StandardResults + key calculations
    FullAll calculations expanded
  5. Generate PDF

    Click Generate. Download starts automatically.
For design checking, use “Full” detail level. For records and approvals, “Standard” is usually sufficient.

Specification Text

Purpose

Ready-to-use text for specification documents, schedules, and contract drawings.

Format

ANCHOR CHANNEL SPECIFICATION

Product:    CPRO 52/34 stainless steel 1.4404
Standard:   EN 1992-4:2018
ETA:        ETA-19/0881
Manufacturer: CFS

Embedment:  47 mm minimum
Material:   Stainless steel grade 1.4404 (316)
Channel length: As shown on drawings

T-bolt:     M10 grade A4-70 stainless
Torque:     25 Nm

Design loads verified:
  Tension:  15.0 kN
  Shear:    12.0 kN
  Utilization: 78%

Concrete:   C30/37 minimum strength
Condition:  Cracked concrete assumed

Installation: Per manufacturer's instructions
              and ETA requirements.

Generating Specification Text

  1. Click ExportSpecification Text
  2. Select connections to include
  3. Choose format:
    • Plain text (copy/paste)
    • NBS format (UK specifications)
    • CSI format (US specifications)
  4. Copy or download

Customization

Edit the generated text to match your project requirements:
  • Add project-specific clauses
  • Adjust formatting to house style
  • Include cross-references to drawings

Summary Sheet

Purpose

Quick reference document for site use, procurement, and coordination.

Contents

Single-page summary showing:
┌─────────────────────────────────────────────────┐
│  PROJECT: Tower A Facade Brackets              │
│  CONNECTION: B-03-01                            │
├─────────────────────────────────────────────────┤
│  PRODUCT         │  CPRO 52/34 SS              │
│  LENGTH          │  200 mm                      │
│  T-BOLT          │  M10 A4-70                   │
│  TORQUE          │  25 Nm                       │
├─────────────────────────────────────────────────┤
│  POSITION        │  80mm from edge              │
│  ORIENTATION     │  Horizontal                  │
├─────────────────────────────────────────────────┤
│  DESIGN LOADS    │  N=15kN, V=12kN             │
│  UTILIZATION     │  78% ✓                       │
│  CONCRETE REQ.   │  C30/37 min                  │
└─────────────────────────────────────────────────┘

Generating Summary Sheet

  1. Click ExportSummary Sheet
  2. Select connections
  3. Download PDF or print directly

CSV Data Export

Purpose

Machine-readable data for:
  • BIM integration
  • Database import
  • Spreadsheet analysis
  • Automated scheduling

Data Fields

FieldExampleNotes
connection_idB-03-01Your identifier
product_codeCPRO 52/34Product reference
material1.4404Material grade
length_mm200Channel length
embedment_mm47hef value
tension_kN15.0Design tension
shear_kN12.0Design shear
utilization0.78Overall utilization
statusPASSPass/Fail

Generating CSV

  1. Click ExportCSV Data
  2. Select connections
  3. Choose fields to include
  4. Download CSV file

BIM Integration

Use CSV data to:
  • Populate Revit schedules
  • Update model parameters
  • Generate quantity takeoffs
  • Feed procurement systems

Report Settings

Company Branding

Add your company details to reports:
  1. Go to SettingsReport Branding
  2. Upload your logo
  3. Enter company name and address
  4. Set report footer text

Default Settings

Configure defaults for all exports:
  • Default detail level
  • Sections to include/exclude
  • Numbering format
  • Unit preferences

Quality Assurance

Report Checklist

Before issuing reports:
  • Project name correct
  • Connection identifiers match drawings
  • Load cases complete
  • Results show passing status
  • Product references accurate
  • Date and version noted
  • Reviewer name included (if applicable)

Version Control

Reports include:
  • Generation timestamp
  • Clariti version
  • User who generated
Keep copies of issued reports for records.
Reports reflect the state at generation time. If you modify the design, regenerate reports to capture updates.

Sharing and Collaboration

Direct Sharing

Share reports directly from Clariti:
  • Email PDF to stakeholders
  • Generate shareable link (view-only)
  • Invite collaborators to project

Export for External Review

For formal submissions:
  1. Generate full PDF report
  2. Save to project documentation
  3. Issue through your QA process
  4. Archive with project records